Chewy Homemade Granola Bars-Simply Delicious
Chewy homemade granola bars recipe are a game-changer for busy mornings and afternoon slumps. Forget those chalky, pre-packaged options that often taste more like cardboard than a wholesome snack. We all crave something satisfying, something that fuels us without the sugar rush and subsequent crash. That’s exactly what these chewy homemade granola bars deliver! They’re packed with wholesome oats, nuts, and a touch of sweetness, making them the perfect portable treat. What truly sets this chewy homemade granola bars recipe apart is its incredible versatility and the sheer joy of knowing exactly what goes into your body. You can customize them to your heart’s content – add dried fruit, chocolate chips, or even a sprinkle of cinnamon. The delightful chewiness is achieved through a simple binder that ensures they hold together beautifully, making them ideal for lunchboxes, gym bags, or simply enjoying with a cup of coffee.

Chewy Homemade Granola Bars Recipe
There’s nothing quite like a homemade granola bar. Forget those cardboard-like, store-bought versions; we’re talking about something truly special here. These chewy homemade granola bars are packed with satisfying textures and a delightful sweetness that will have you reaching for seconds. They’re perfect for a quick breakfast on the go, a satisfying afternoon snack, or even a post-workout treat. The beauty of making them yourself is that you can control the ingredients and tailor them to your liking. Plus, the aroma that fills your kitchen while these bake is simply irresistible! This recipe is incredibly straightforward, making it a fantastic option for bakers of all skill levels. Let’s get started on creating some deliciousness!
Ingredients:
- 6 tablespoons unsalted butter
- 6 tablespoons brown sugar (, packed)
- 2/3 cup honey
- 3 cups rolled oats
- 1 1/2 cups Rice Krispies cereal
- 1/2 cups graham crackers (, crushed in pieces and crumbs)
- 1/2 teaspoon salt
- 1/2 cup mini chocolate chips
- 1/2 cup cereal marshmallows
Prepping Your Pan and Oven
The first step to baking any treat is to ensure your equipment is ready. Preheat your oven to 350 degrees Fahrenheit (175 degrees Celsius). This temperature is ideal for gently melting the binders and toasting the oats without burning them. While the oven heats, prepare your baking pan. A standard 8×8 inch or 9×9 inch square baking pan works perfectly for this recipe. To prevent any sticking and to make removal a breeze, line your pan with parchment paper. Make sure the parchment paper extends up the sides of the pan, creating little “handles.” This will allow you to lift the entire slab of granola bars out of the pan once they’ve cooled, making cutting so much easier.
Melting the Binder
In a medium saucepan, combine the unsalted butter, packed brown sugar, and honey. Place the saucepan over medium-low heat. It’s important to use medium-low heat here to avoid scorching the sugars. Stir the mixture constantly with a whisk or spatula until the butter is completely melted and the brown sugar has dissolved, creating a smooth, glossy syrup. This syrupy mixture is the magic binder that will hold all our delicious ingredients together, giving our granola bars that desirable chewy texture. Once everything is melted and combined, remove the saucepan from the heat. You want it warm and pourable, but not boiling hot, as extreme heat can affect the texture of the other ingredients.
Combining the Dry Ingredients
In a large mixing bowl, combine the rolled oats, Rice Krispies cereal, crushed graham crackers, and salt. Give these dry ingredients a good stir to ensure they are evenly distributed. The rolled oats will provide a hearty, chewy base, while the Rice Krispies add a delightful crispness that contrasts beautifully with the chewiness. The crushed graham crackers contribute a subtle cinnamon-sugar flavor and help bind everything together. The salt, though a small amount, is crucial for enhancing all the other flavors in the bars, preventing them from tasting overly sweet.
Creating the Granola Bar Mixture
Now comes the fun part! Pour the warm honey-butter mixture from the saucepan into the large bowl with the dry ingredients. Using a sturdy spatula or a wooden spoon, mix everything thoroughly until all the dry ingredients are completely coated with the sticky binder. Make sure to scrape the bottom and sides of the bowl to ensure no dry pockets remain. This step is vital for achieving that cohesive, chewy texture. Once everything is well combined, gently fold in the mini chocolate chips and the cereal marshmallows. Be gentle at this stage to avoid melting the marshmallows too much before baking. We want them to soften and become delightfully gooey within the bars.
Pressing and Baking Your Bars
Carefully transfer the granola mixture into your prepared baking pan. Using the parchment paper “handles” or a spatula, press the mixture down firmly and evenly into the pan. The more you press, the more cohesive and less crumbly your bars will be. This firm pressing is key to achieving those perfect, sliceable squares. Make sure the surface is as flat and even as possible. Place the pan in the preheated oven and bake for 20-25 minutes. You’re looking for the edges to be golden brown and the center to be set. The aroma that will waft from your oven is a delicious indicator that they’re nearly ready!
Cooling and Cutting
Once baked, remove the pan from the oven and let it cool completely on a wire rack. This cooling period is absolutely critical. Resist the urge to cut into them while they are warm; they will likely fall apart. Patience is your best friend here! Allow them to cool in the pan for at least 1-2 hours, or until they are completely firm. Once cooled, use the parchment paper handles to lift the entire slab out of the pan and onto a cutting board. Using a sharp knife, cut the slab into your desired bar sizes. For perfectly clean cuts, you can even place the slab in the refrigerator for about 30 minutes before cutting, as the slight chill helps firm them up even further. Store your delicious chewy homemade granola bars in an airtight container at room temperature for up to a week. Enjoy every satisfying bite!
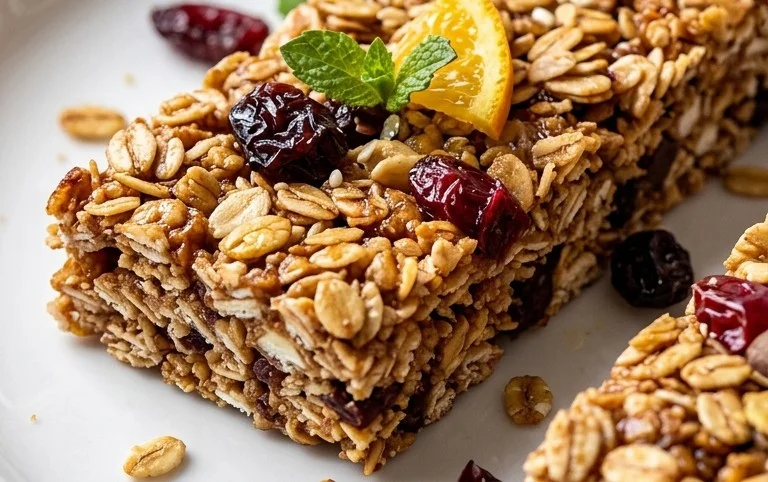
Conclusion:
You’ve just discovered the secret to perfectly chewy homemade granola bars! This recipe is a game-changer because it allows you to control every ingredient, ditching the preservatives and excess sugar often found in store-bought options. The result is a delicious, satisfying, and customizable treat that’s perfect for breakfast on the go, a mid-afternoon energy boost, or a healthy snack anytime. Imagine the delightful combination of wholesome oats, crunchy nuts, sweet dried fruit, and a binding syrup that holds it all together beautifully. They truly are the best chewy homemade granola bars you’ll ever make!
For serving, I love breaking them into bars and wrapping them individually for easy packing. They are fantastic alongside a cup of coffee or tea, or even crumbled over yogurt for added texture and flavor. Don’t be afraid to get creative with variations! Swap out the nuts for seeds like sunflower or pumpkin, use different dried fruits like cranberries or apricots, or add a sprinkle of cinnamon or nutmeg for a warming spice. Give this recipe a try – you won’t regret the effort for such a rewarding and delicious outcome!
Frequently Asked Questions about Chewy Homemade Granola Bars:
Q: How do I make my granola bars chewier?
A: The key to chewiness lies in the binding ingredients and baking time. Using honey or maple syrup, along with a bit of nut butter or even a mashed banana, helps create that desirable soft and chewy texture. Overbaking can lead to dry and crumbly bars, so be sure to bake just until the edges are golden brown and the center is set, then allow them to cool completely before cutting.
Q: Can I make these granola bars vegan?
A: Absolutely! To make these vegan, simply ensure you are using a vegan sweetener like maple syrup or agave nectar. If your recipe calls for honey, swap it out. Also, if you’re adding any optional ingredients like chocolate chips, opt for vegan varieties. It’s incredibly easy to adapt this recipe to fit a vegan lifestyle.
Q: How long do these chewy homemade granola bars last?
A: Stored properly in an airtight container at room temperature, these bars will stay fresh and chewy for about a week. For longer storage, you can keep them in the refrigerator for up to two weeks, though they might become a bit firmer. They also freeze well for up to a month; just thaw them at room temperature before enjoying.
Chewy Homemade Granola Bars
Deliciously chewy homemade granola bars packed with oats, cereal, graham crackers, and chocolate chips, perfect for snacks.
Ingredients
-
6 tablespoons unsalted butter
-
6 tablespoons brown sugar (packed)
-
2/3 cup honey
-
3 cups rolled oats
-
1 1/2 cups Rice Krispies cereal
-
1/2 cups graham crackers (crushed in pieces and crumbs)
-
1/2 teaspoon salt
-
1/2 cup mini chocolate chips
-
1/2 cup cereal marshmallows
Instructions
-
Step 1
Line an 8×8 inch baking pan with parchment paper, leaving an overhang on the sides. -
Step 2
In a large saucepan, melt the butter over medium heat. Stir in the brown sugar and honey, and cook until the sugar is dissolved, stirring constantly. -
Step 3
Remove the saucepan from the heat. Stir in the rolled oats, Rice Krispies cereal, crushed graham crackers, and salt until well combined. -
Step 4
Fold in the mini chocolate chips and cereal marshmallows. -
Step 5
Press the mixture evenly into the prepared baking pan using a spatula or the bottom of a glass. -
Step 6
Refrigerate for at least 1 hour, or until firm. Lift the slab out of the pan using the parchment paper overhang and cut into bars.
Important Information
Nutrition Facts (Per Serving)
It is important to consider this information as approximate and not to use it as definitive health advice.
Allergy Information
Please check ingredients for potential allergens and consult a health professional if in doubt.


